Overview
The Route Rollover feature allows schools to carry student bus bookings from one academic period to the next based on actual travel usage.
Rather than manually recreating bookings every term, RollCall analyses historical travel data, automatically identifies regular travellers, and creates bookings for the next academic period in just a few steps.
The rollover process is completed per route and consists of two stages:
Stage 1 – Student Selection
Stage 2 – Booking Configuration
This feature is particularly useful for schools with high-demand routes, allowing seats to be prioritised for students who regularly use the service.
Accessing Route Rollover
Navigate to:
Settings → Routes
Select the route you wish to roll over.
Click the Rollover tab.
Note: Route Rollover is completed individually for each route and is separate from the annual End of Year Rollover process.

Stage 1 – Student Selection
Step 1 – Select the Reference Period
Choose the academic period you want RollCall to use when analysing student travel.
Examples include:
Term 1
Term 2
Full Year
The selected period determines which bookings are used to calculate each student's usage percentage.
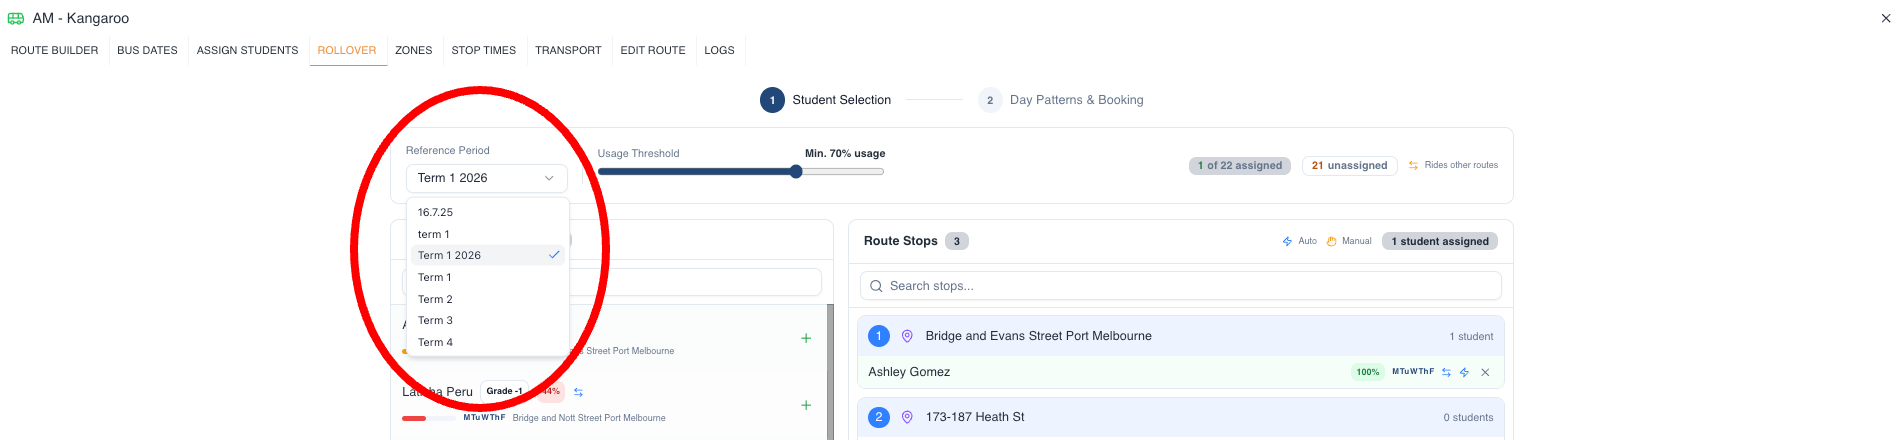
Step 2 – Set the Usage Threshold
Use the Usage Threshold slider to determine which students should automatically be included in the rollover.
For example:
A threshold of 70% means students who travelled on at least 70% of available trips will automatically be included.
As you adjust the slider:
Students meeting the threshold appear in the Included list.
Students below the threshold move to the Excluded list.
The student lists update instantly as the threshold changes.
Step 3 – Review Student Usage
Each student displays useful information to help determine whether they should continue onto the route.
Information includes:
Usage Percentage
Assigned Stop
Typical Travel Days
Booking Heatmap
Cross-Route Indicator (if applicable)
The Assigned Stop is the stop the student most frequently used during the selected reference period.
The Typical Travel Days are automatically calculated from the student's historical bookings.
Step 4 – Review Cross-Route Usage
If a student also travels on other routes, a Cross-Route Indicator is displayed.
Selecting or hovering over this indicator allows you to view:
Route Group
Route Name
Booking frequency
Show-up rate
Typical travel days
This helps prevent duplicate bookings and assists when reviewing students who regularly travel on multiple services.
Step 5 – Manually Adjust Students
Although RollCall automatically selects students based on the usage threshold, you can manually override these selections.
You can:
Add students who did not meet the threshold
Remove students who should not continue
If required, click Reset Overrides to return to the automatic threshold selection.
Step 6 – Search for Students
Use the search bar to quickly locate students.
Search is available across:
Included students
Excluded students
Stop assignments
Once you are satisfied with the student selection, click Next.
Stage 2 – Booking Configuration
Step 7 – Review Booking Groups
Students are automatically grouped based on their historical travel patterns.
Examples include:
Monday to Friday
Monday, Wednesday & Friday
Tuesday & Thursday
Grouping is automatic, helping reduce manual setup.
Step 8 – Edit Travel Patterns
If required, you can:
Add or remove travel days from a group
Move students between groups
This allows booking patterns to be customised before creating the new bookings.
Step 9 – Select the Booking Period
Choose the booking period for the rollover.
You can either:
Select an existing Academic Period
Enter a Custom Start and End Date
When an Academic Period is selected, RollCall automatically populates the booking dates.
If custom dates are entered, those dates will take priority.
Step 10 – Select the Repeat Pattern
Choose how the bookings should repeat.
Available options:
Weekly
Fortnightly
Note: Fortnightly bookings begin from the selected start date and repeat every second week thereafter.
Step 11 – Review the Booking Configuration
Before continuing, review:
Student groups
Assigned travel days
Booking period
Repeat pattern
If changes are required, you can return to Stage 1 without losing any selections.
Step 12 – Confirm the Rollover
Click Confirm to review the rollover summary.
The confirmation screen displays:
Total students included
Number of booking groups
Booking period
Repeat pattern
Choose a Rollover Mode
If any students have been excluded from the rollover, you will be asked how their future bookings should be handled.
Update Only (Recommended)
Creates or updates bookings for the selected students only.
Excluded students:
Keep their existing future bookings.
Bookings outside the selected travel pattern are also preserved.
This is the safest option and is selected by default.
Clean Slate
Removes all existing future bookings for the selected route and booking period before creating the new bookings.
Excluded students will lose their future bookings for that route.
Before confirming, RollCall displays:
Number of affected students
List of students whose bookings will be removed
Use this option when the rollover should become the new source of truth for the route.
When All Students Are Included
If every student has been included:
The rollover mode selection is hidden.
Both options produce the same outcome, so no selection is required.
Completion
Once the rollover has completed, RollCall displays a confirmation message summarising the results.
This includes:
Students processed
Booking groups created
Bookings created
Previous bookings replaced (if applicable)
If any bookings could not be created, RollCall will identify the affected dates and explain the reason.
Examples include:
No route event exists
Route event is already in progress or completed
Route capacity would be exceeded
Important Notes
Route Rollover is completed per route.
Students are automatically sorted by their travel usage percentage.
Student selections can be manually overridden at any time before confirmation.
Cross-route information helps identify students travelling on multiple services.
Weekly and Fortnightly booking patterns are supported.
Returning to Stage 1 does not remove your Stage 2 changes.
Route capacity is automatically validated before bookings are created.
Update Only preserves existing bookings and is recommended for most schools.
Clean Slate replaces all future bookings for the selected route and booking period.
Best Practice Recommendations
✅ Select the correct reference period before adjusting the usage threshold.
✅ Review students near the threshold before confirming.
✅ Check cross-route usage for students travelling on multiple services.
✅ Review automatically generated booking groups before creating bookings.
✅ Use Update Only unless you intentionally want to replace all future bookings.
✅ Review the confirmation summary before completing the rollover.
✅ Check any skipped or failed dates after completion to ensure all required bookings have been created.
This version combines all functionality described in the acceptance criteria and API reference into a single, client-friendly training guide while avoiding technical implementation details.
Was this article helpful?
That’s Great!
Thank you for your feedback
Sorry! We couldn't be helpful
Thank you for your feedback
Feedback sent
We appreciate your effort and will try to fix the article