Guide for School Administrators managing new bus applications, student intake, seating and waitlists in RollCall.
Bookings Intake Workflow – Video Guide
Before working through the step-by-step instructions below, watch the Bookings Intake Workflow Video Guide for a complete walkthrough of the process.
The video demonstrates the full workflow, including:
- Setting up your school year and booking periods
- Configuring how parents can submit applications
- Completing the Online Booking Form
- Reviewing applications in Intake
- Matching applications to existing or new students
- Moving students to Ready to Seat
- Assigning students to buses and stops
- Managing students who cannot yet be seated
- Using the Waitlist
- Manually recording applications received by phone or email
Video: Bookings Intake Workflow
Tip: We recommend watching the video first for an overview of the complete process, then using the sections below as a step-by-step reference when configuring and managing your bookings.
1. Overview
The Bookings Intake Workflow provides schools with a centralised process for managing new student bus applications.
Parents can submit a bus application through:
- An Online Booking Form provided by the school
- The RollCall Parent App
Schools can also manually record applications received by phone, email or another method.
Once submitted, applications move through a simple workflow:
Application Submitted → Intake → Ready to Seat → Seat Assignment → Seated or Waitlisted
The workflow is managed from:
Settings → Bookings
The three main areas are:
- Setup – Configure terms, booking windows and how parents can apply.
- Intake – Review and process applications.
- Seat – Assign accepted students to buses and stops.
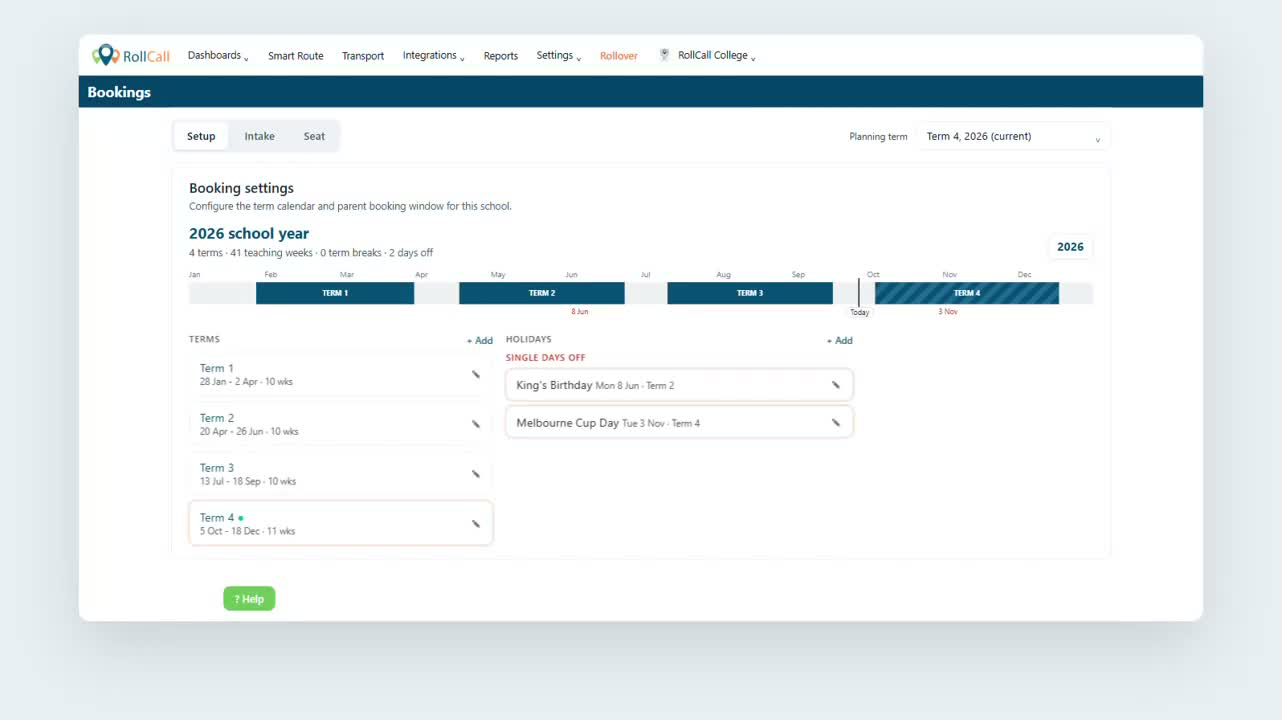
2. Select Your Planning Term
At the top of the Bookings area, the Planning Term shows which academic period you are currently working with.
The current term is clearly identified.
Use the Planning Term dropdown when you need to:
- Prepare bookings for an upcoming term
- Review applications from another term
- Look back at a previous term
Tip: Check the Planning Term before processing applications or assigning seats to make sure you're working with the correct period.
3. Set Up Your School Year
Navigate to:
Settings → Bookings → Setup
The Booking Settings timeline provides an overview of your school year, including:
- Terms
- School holidays
- Individual days off
- Blocks of non-operational days
Add Your Terms
Add each academic term with its:
- Start Date
- End Date
Once a term has commenced, past dates are locked to prevent accidental changes.
You can still extend:
- The Term End Date
- The Parent Booking Window
This allows schools to continue accepting bookings when required.
Add Holidays and Days Off
Add any dates where your normal bus services will not operate.
You can configure:
- A single day off
- A block of days
- School holiday periods
Setting these dates up at the beginning of the school year allows RollCall to work around your school's calendar
when managing bookings.
4. Choose How Parents Can Apply
Schools can accept applications using:
- Parent App
- Online Booking Form
- Both
You can choose whichever combination best suits your school's booking process.
Option 1 – Parent App
Schools can open a Parent Booking Window allowing parents to submit their bus booking requirements through the RollCall Parent App.
The booking window can be configured for:
- An individual term
- The whole year
A school-wide booking window can be used as the default across terms and overridden for an individual term when required.
Option 2 – Online Booking Form
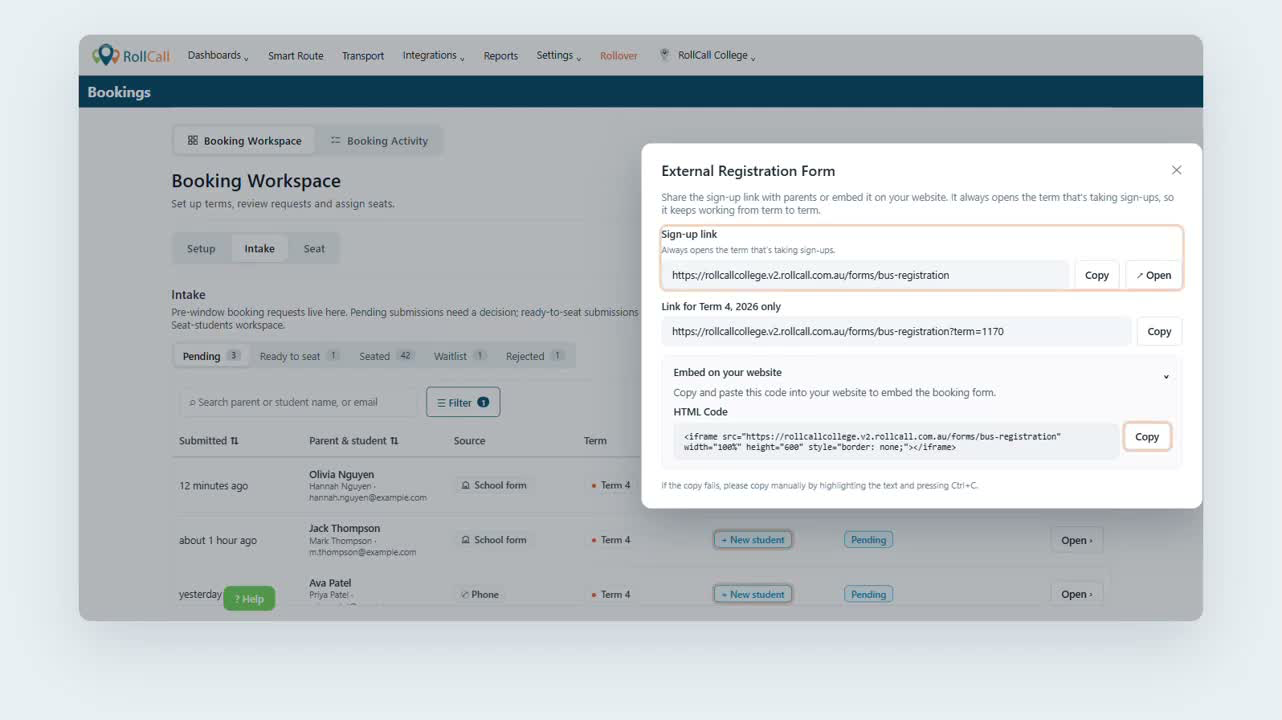
The Online Booking Form provides a link that can be shared with parents who need to apply for bus travel.
From Setup, select External Form Link.
Several options are available.
Sign-Up Link
The main Sign-Up Link automatically opens the term currently accepting applications.
This means the same link can continue to be shared with parents from term to term.
You can add the link to:
- Emails
- Newsletters
- Your school website
- Other parent communications
Term-Specific Link
If you only want parents to apply for a particular term, use the term-specific link.
Embed on Your Website
Select Embed on Your Website → Copy to copy the provided embed code.
Your school's website administrator can add this code to a page on your school website so the booking form appears directly on the page.
Preview the Parent Form
Select Open Parent Form to see the application exactly as parents will see it.
You can also complete a test application if required.
5. What Parents Complete
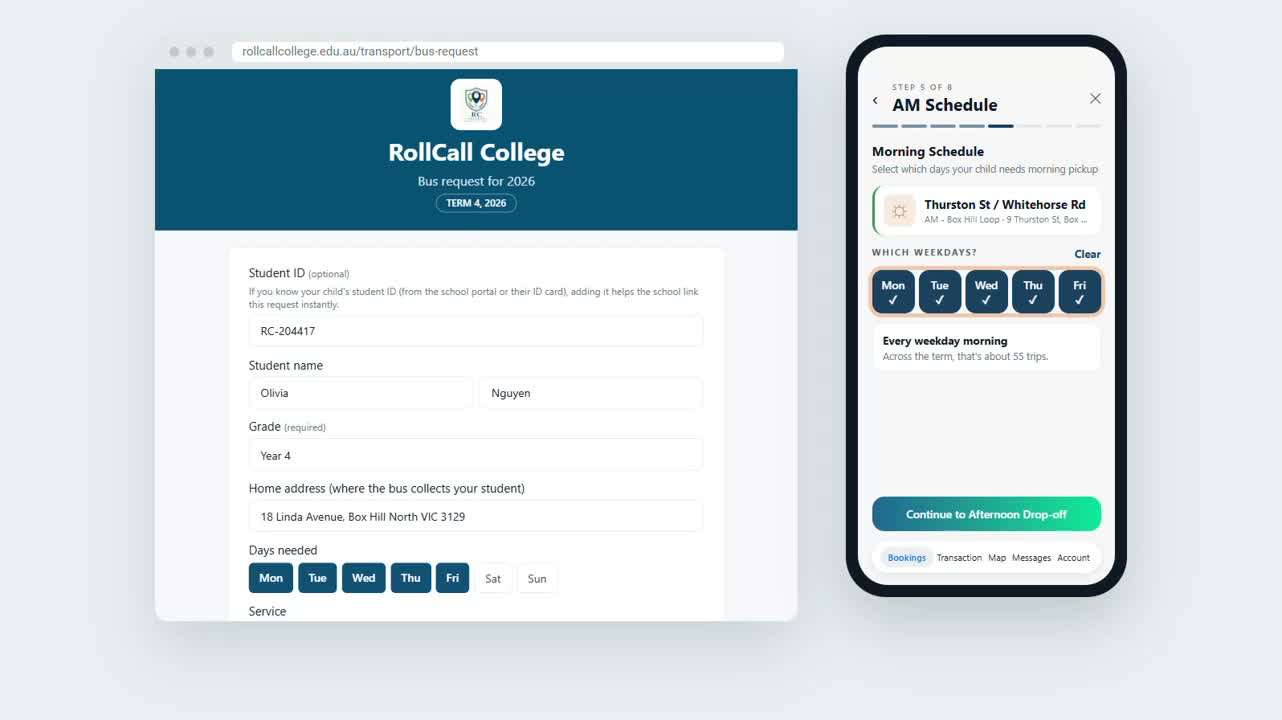
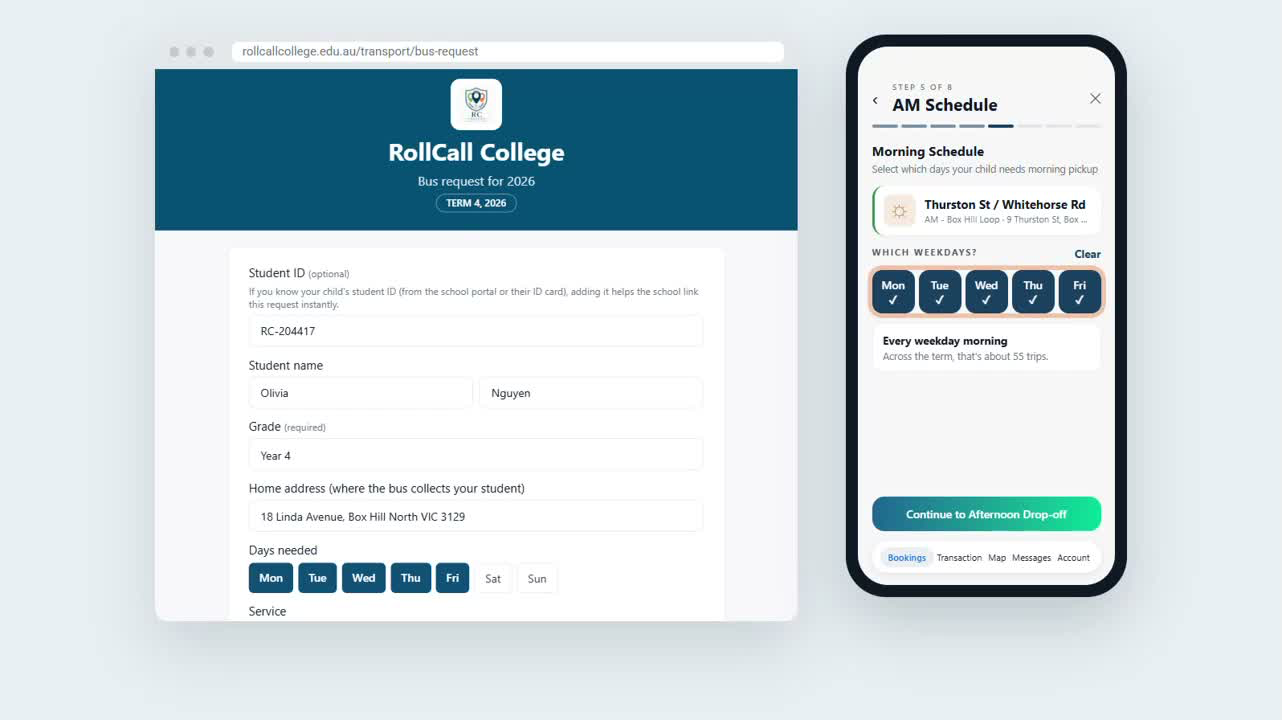
The Online Booking Form collects the information required to assess the student's transport needs.
Parents provide:
Student Details
- Student Name
- Grade
- Student ID, if known
Providing the Student ID can help RollCall match the application to an existing student.
Travel Requirements
Parents provide:
- Home Address
- Required travel days
- AM travel
- PM travel
- Or both AM and PM travel
The Home Address assists when identifying suitable bus routes and stops.
Parent Details
Parents also provide:
- Parent Name
- Email Address
- Phone Number
- Additional Notes, if required
Once submitted, the application is sent directly to the school's Intake area.
6. Review New Applications
Navigate to:
Settings → Bookings → Intake
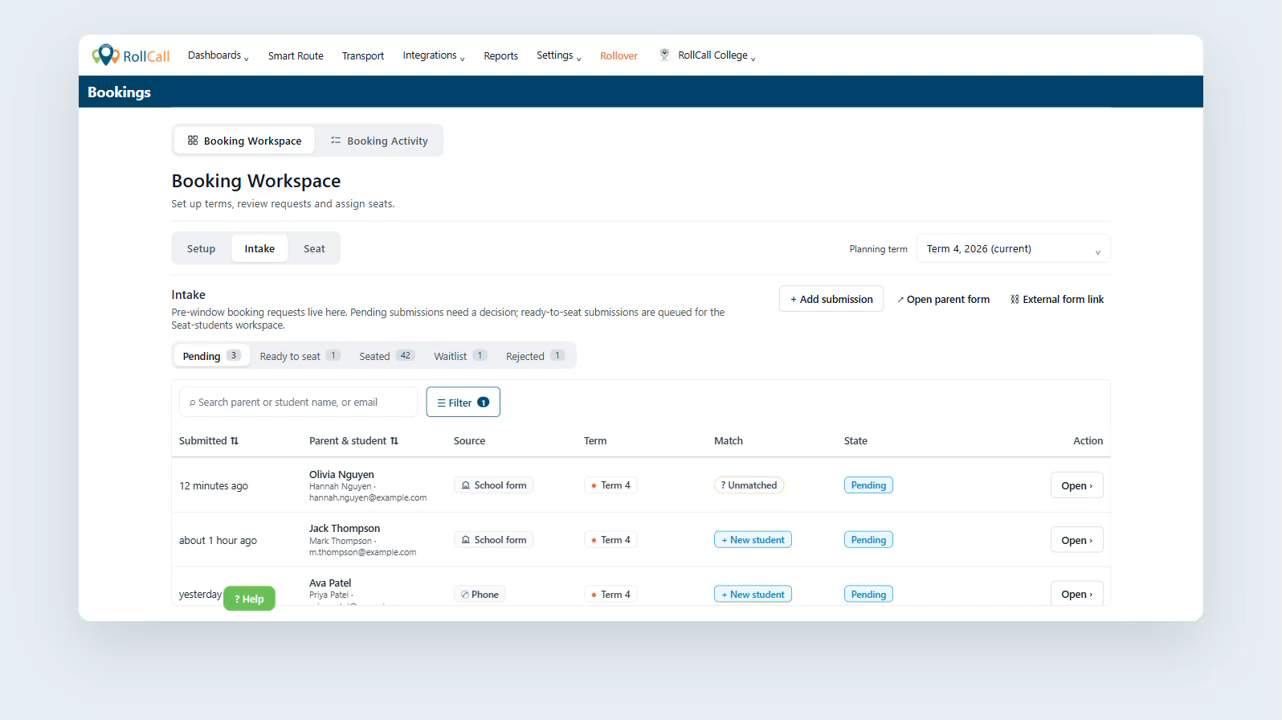
All applications appear here regardless of whether they were submitted through the Online Booking Form or Parent App.
The Intake area is separated into:
- Pending
- Ready to Seat
- Seated
- Waitlisted
- Rejected
Each tab displays a count so you can quickly see how many applications are at each stage.
7. Understanding the Pending Queue
The Pending tab contains applications that need to be reviewed.
Each application shows information including:
- Submission Date
- Parent Name
- Student Name
- Source
- Planning Term
- Student Match
- Current State
The Source identifies how the application was received, such as the School Form, Parent App or a manually logged submission.
8. Student Matching
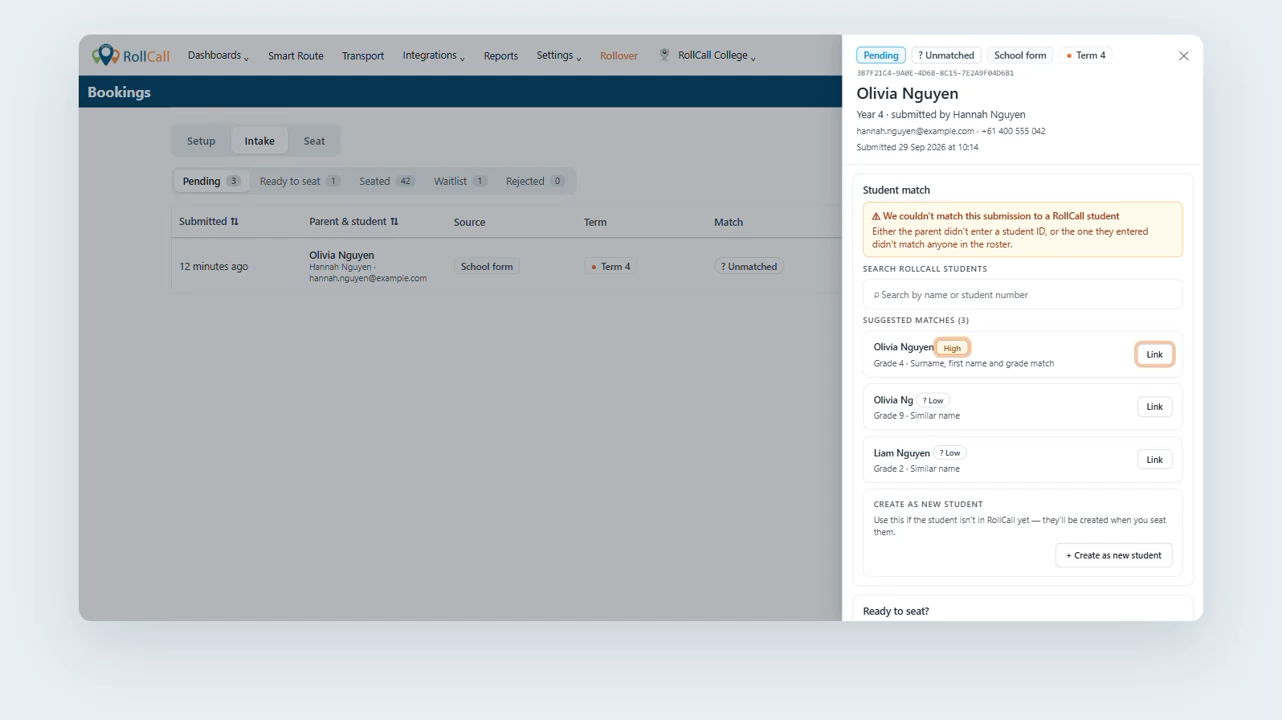
RollCall attempts to match each application against your existing student records.
The Match column helps identify what action is required.
Matched
If RollCall identifies a matching Student ID or student name, the application can be matched to that existing student.
New Student
If the application appears to belong to a new enrolment, it will display as a New Student.
Unmatched
If RollCall cannot confidently identify the student, the application displays as Unmatched so the School Admin can review it manually.
9. Process an Application
Select Open against an application to review it.
From here, you can:
- Match to an Existing Student
- Create a New Student
- Send to Ready to Seat
- Reject the Application
Once an application has been accepted, move it to Ready to Seat.
These students then become available in the Seat workflow.
Rejecting an Application
If an application cannot be accepted, select Reject and provide a reason.
The application is retained under Rejected, along with the reason it was declined.
This provides a clear record if the parent contacts the school about their application later.
10. Assign Students to a Seat
Navigate to:
Settings → Bookings → Seat
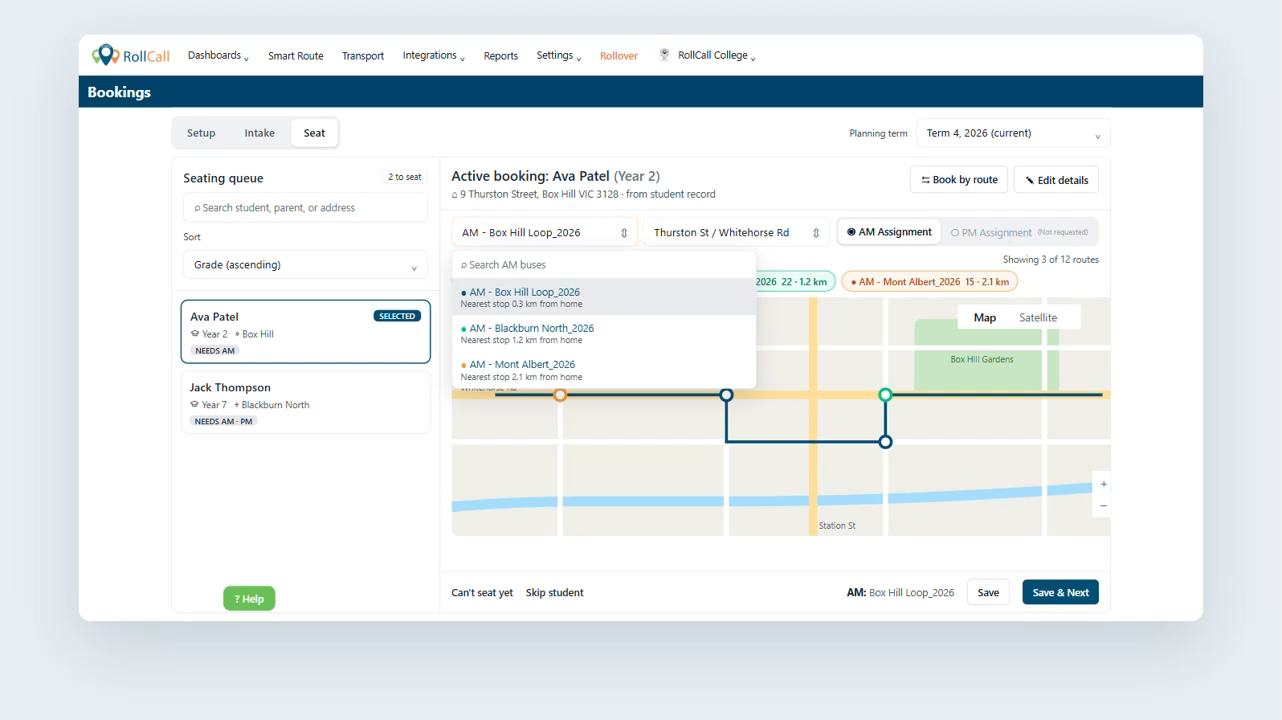
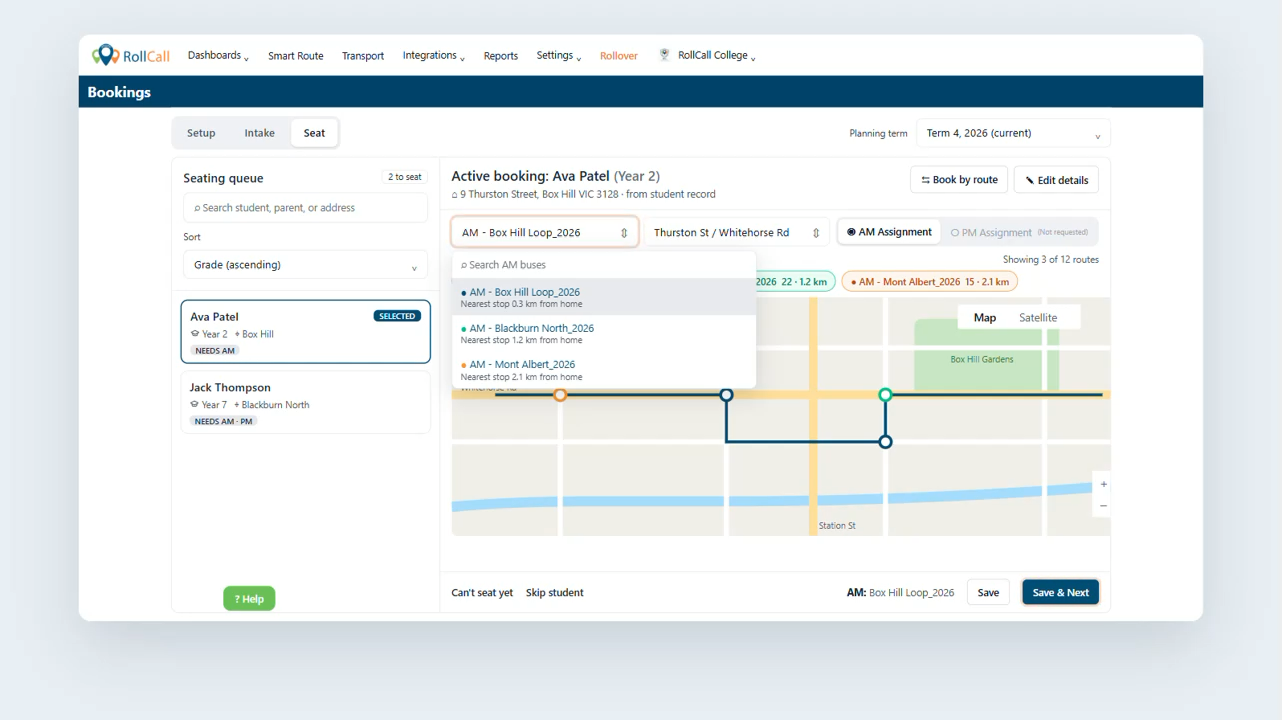
The left side of the screen contains your Seating Queue, showing students who still require a seat.
You can:
- Search for a student
- Sort students by Grade
Each student card displays their travel requirements, such as whether they require AM, PM, or both services.
Select a student to begin assigning their travel.
11. Review Suggested Routes
When you select a student, their booking requirements open alongside their Home Address.
RollCall suggests the three nearest routes based on the student's location.
The map displays:
- Student's Home Address
- Available Stops
- Students already assigned
You can also search the available bus list.
Each bus shows the distance between the student's home and its nearest stop, with the closest options shown first.
This helps School Admins identify a suitable service without manually checking every route.
12. Assign the AM and PM Journey
Select the required bus and then choose the student's stop.
For an AM booking:
- Select the Bus.
- Select the Stop.
- Review the assignment.
If the student also requires PM travel, switch to the PM Assignment and repeat the process.
The bottom of the screen displays the AM and PM status as Pending until each required journey has been assigned.
Once complete, select:
- Save – Save the student's assignment.
- Save & Next – Save and immediately move to the next student in the seating queue.
13. Book by Route
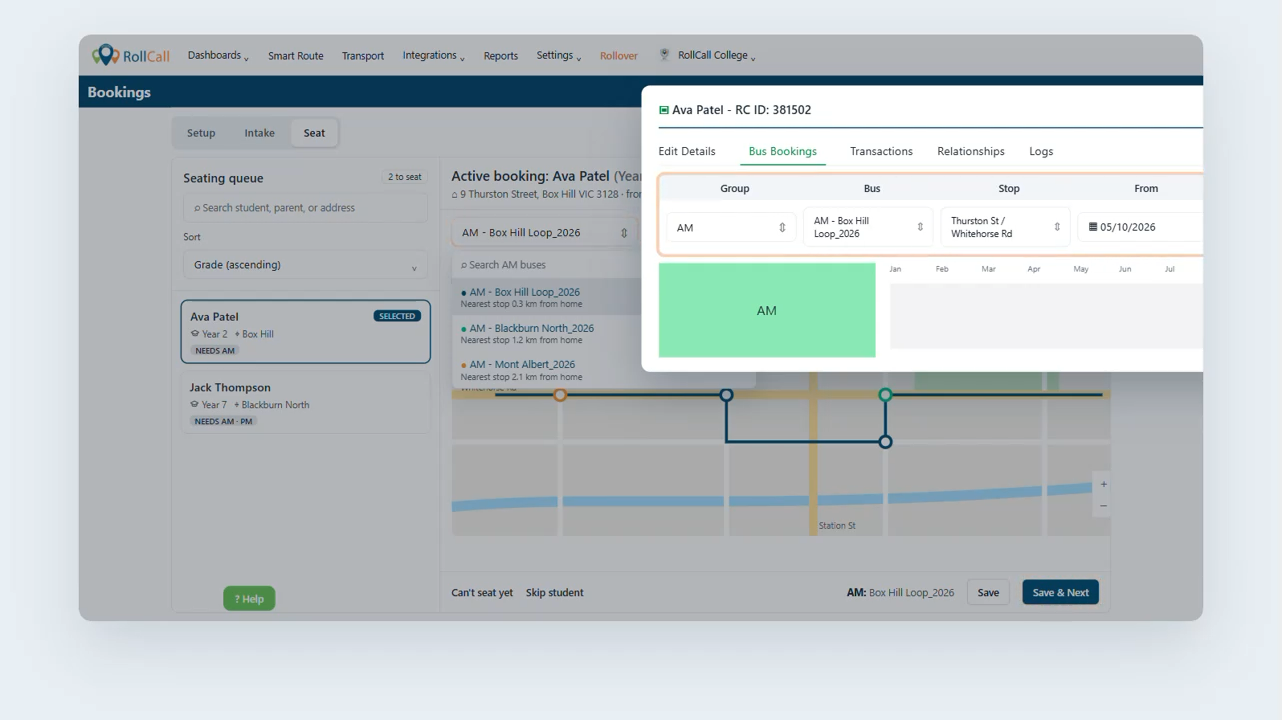
If you need more control over the student's booking, use Book by Route.
This opens the student's bus booking configuration where you can select:
- AM or PM
- Bus
- Stop
- From Date
- To Date
Select Apply once the required booking has been configured.
This is useful when the student requires specific booking dates rather than the standard term configuration.
14. When You Can't Seat a Student
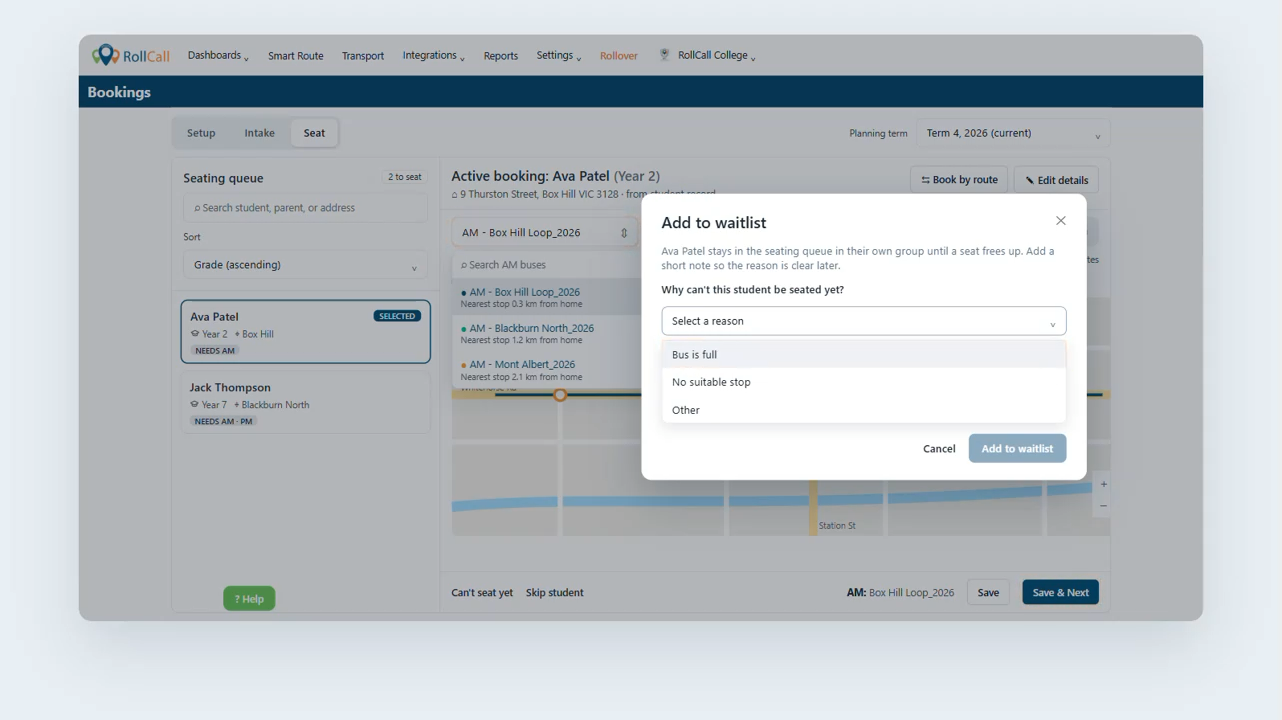
If you cannot currently offer the student a suitable seat, select Can't Seat Yet.
Choose the reason, such as:
- Bus is full
- No suitable stop
You can then add a short note explaining the situation.
From here, you can either:
- Add to Waitlist
- Skip Student and return to them later
15. Managing the Waitlist
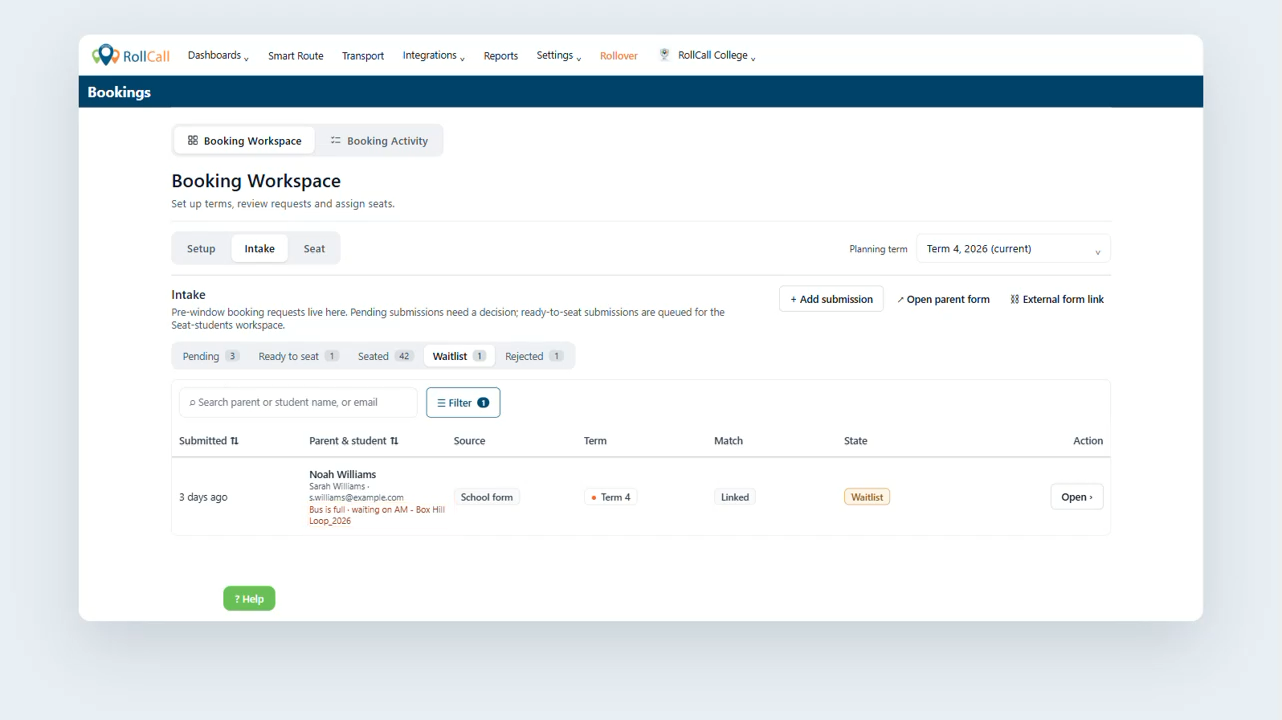
Students added to the Waitlist remain visible within the workflow until they can be seated.
The Waitlisted area shows:
- Student
- Waitlist reason
- Notes recorded by the School Admin
For example, your note could identify the particular bus the student is waiting for.
Waitlisted students remain within their own group in the Seating Queue, making it easier to revisit them when a seat becomes available.
Tip: Adding a clear note when waitlisting a student makes it easier for another School Admin to understand what needs to happen before the student can be seated.
16. Manually Add an Application
Not every parent application will arrive through the Parent App or Online Booking Form.
If a parent:
- Calls the school
- Sends an email
- Provides their details another way
you can record the application directly in RollCall.
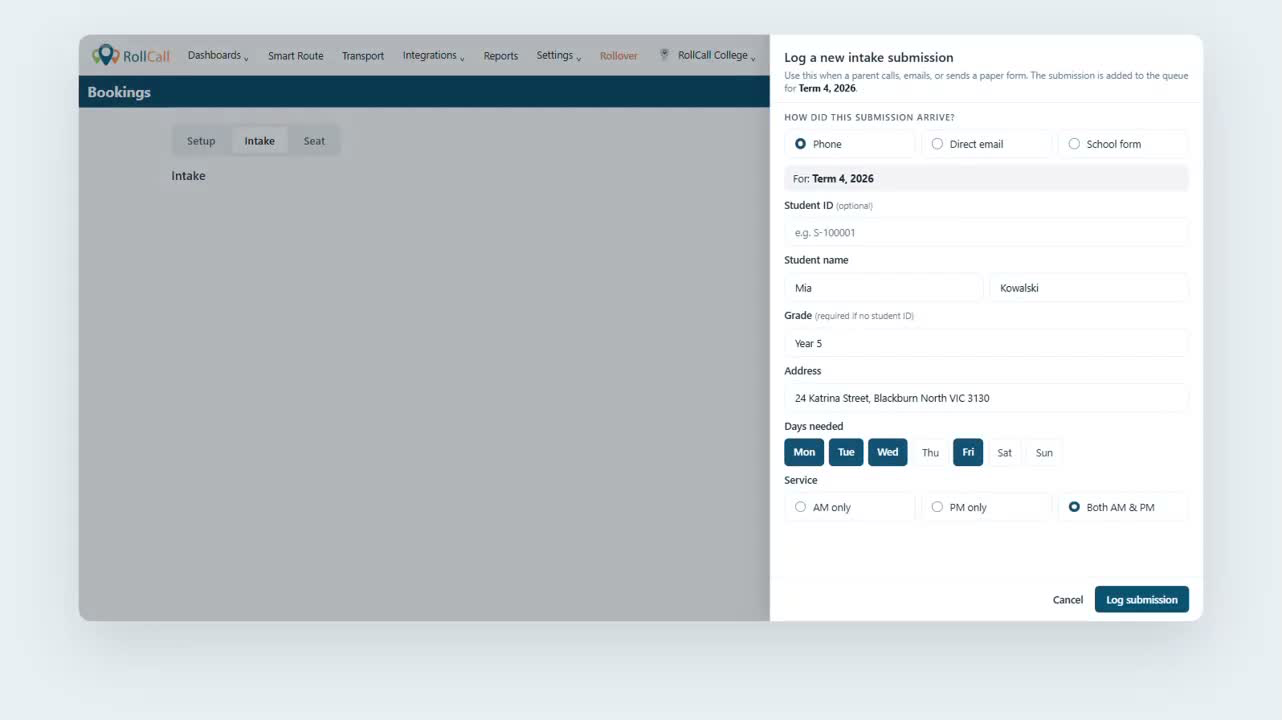
From Intake, select Add Submission.
- Select how the application was received.
- Enter the student details.
- Enter the travel requirements.
- Enter the parent details.
- Ensure a Parent Phone Number is provided.
- Select Log Submission.
The application joins the Intake Queue for the selected term and retains a record of how it was received.
Best Practice: Use Add Submission for phone and email applications rather than creating the booking outside the Intake Workflow. This keeps a clear record of how and when the request was received.
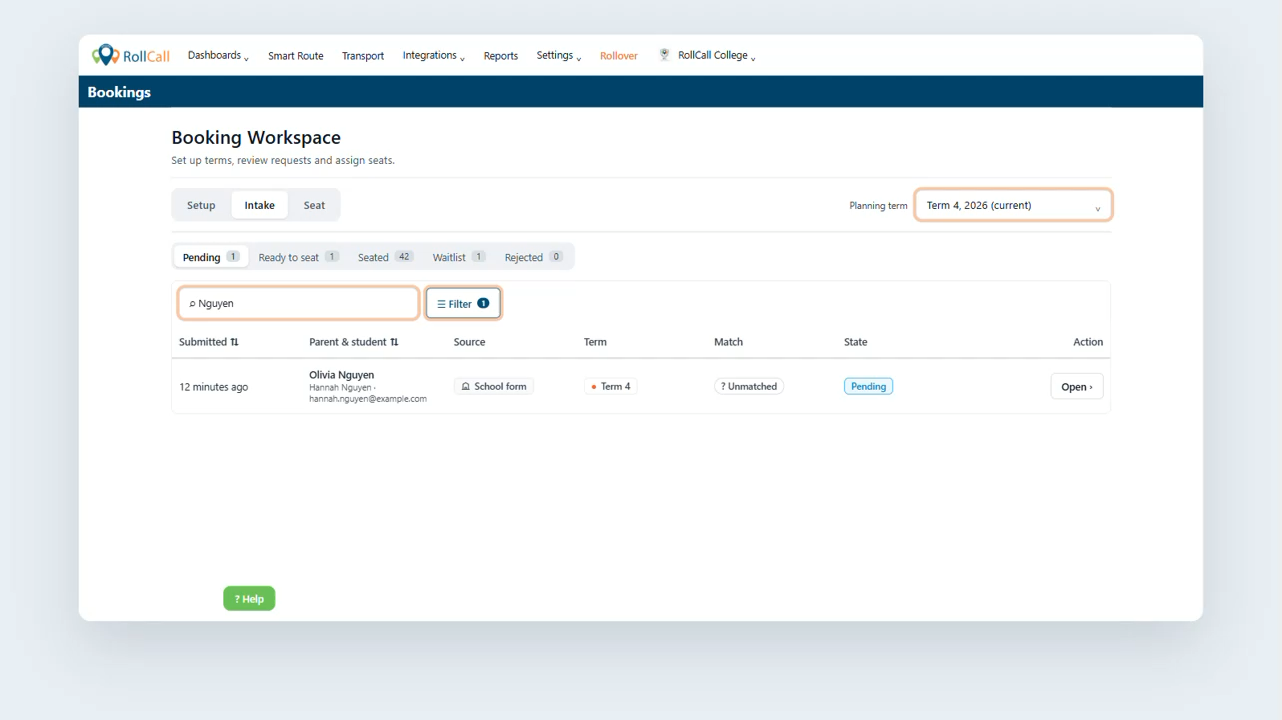
17. Search and Filter Applications
For schools processing a large number of applications, the Intake area can be searched and filtered.
You can search using:
- Student Name
- Parent Name
- Parent Email
Individual columns can also be filtered to narrow down the applications displayed.
This can be useful when reviewing applications for a particular term, source or workflow status.
18. Completing the Term's Intake
As applications are processed, students move through the workflow:
Pending → Ready to Seat → Seated
Where a student cannot currently be accommodated:
Pending → Ready to Seat → Waitlisted
Applications that are declined move to:
Rejected
Continue working through the Seat queue until all students have either been seated or appropriately waitlisted.
When the Seat area shows that everyone has been seated, the seating process for the term is complete.
Best Practice Recommendations
- Set up your Terms, Holidays and Days Off at the beginning of the school year.
- Confirm the correct Planning Term before processing applications.
- Decide whether your school will accept applications through the Parent App, Online Booking Form, or both.
- Use the general Sign-Up Link if you want one link that continues working from term to term.
- Review Unmatched applications carefully before creating a new student.
- Use Ready to Seat only once an application has been reviewed and accepted.
- Review the suggested routes and map when selecting the most appropriate stop for a student.
- Add clear notes when placing a student on the Waitlist.
- Use Add Submission for applications received by phone or email so there is a record of how the request was received.
- Use Save & Next when processing a large seating queue to move efficiently through applications.
Was this article helpful?
That’s Great!
Thank you for your feedback
Sorry! We couldn't be helpful
Thank you for your feedback
Feedback sent
We appreciate your effort and will try to fix the article