When you have a group of new students to add, such as next year's enrolments, you don't need to enter them one by one. Fill in RollCall's student template in Excel, upload it, fix anything RollCall flags, and import them all at once.
Open the student import
- Go to Settings, then select Students.
- At the top right, select Import.
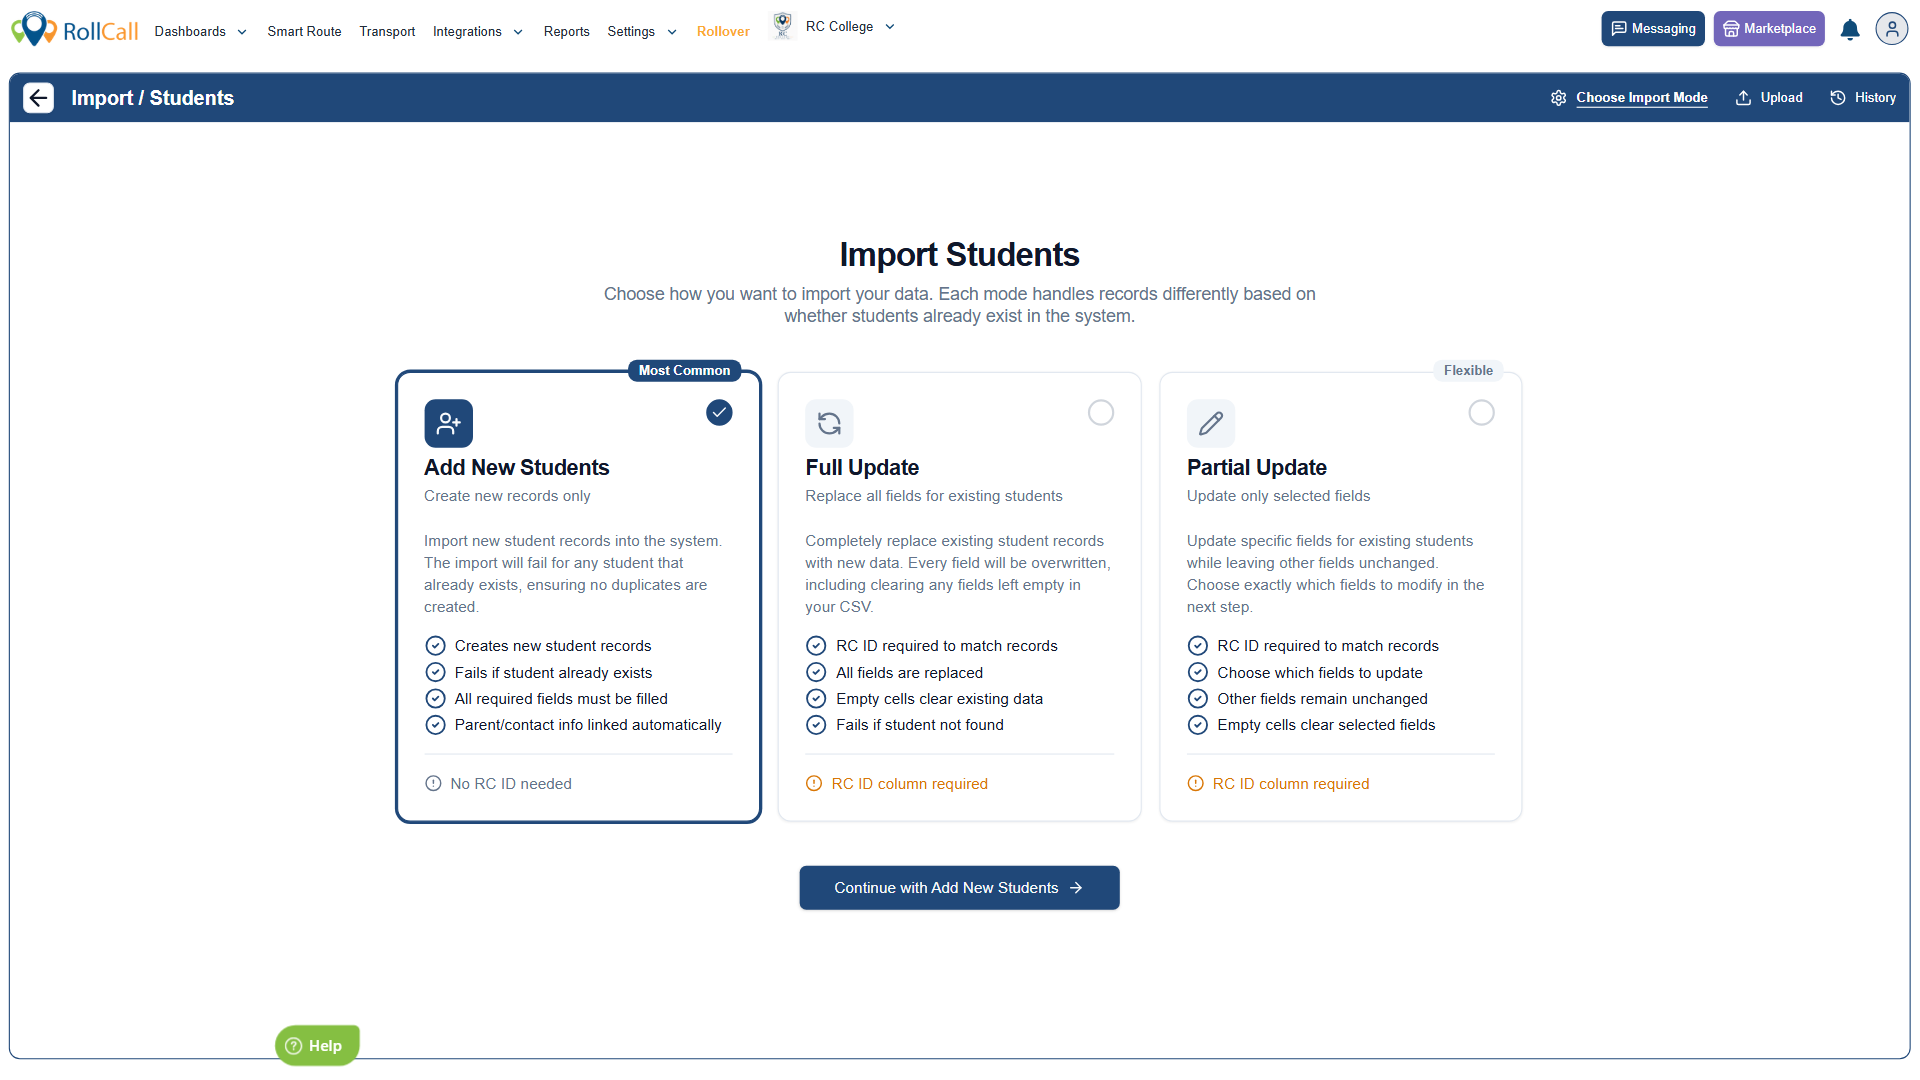
- Choose Add New Students, then select Continue with Add New Students.
Add New Students only creates new records. It won't change or duplicate any student who is already in RollCall: the import fails for a student who already exists.
The other two modes are for students already in RollCall, and both need the RC ID column so RollCall can match each record:
- Full Update replaces every field. Empty cells in your CSV clear what's there.
- Partial Update lets you choose which fields to update and leaves the others unchanged.
Download the template
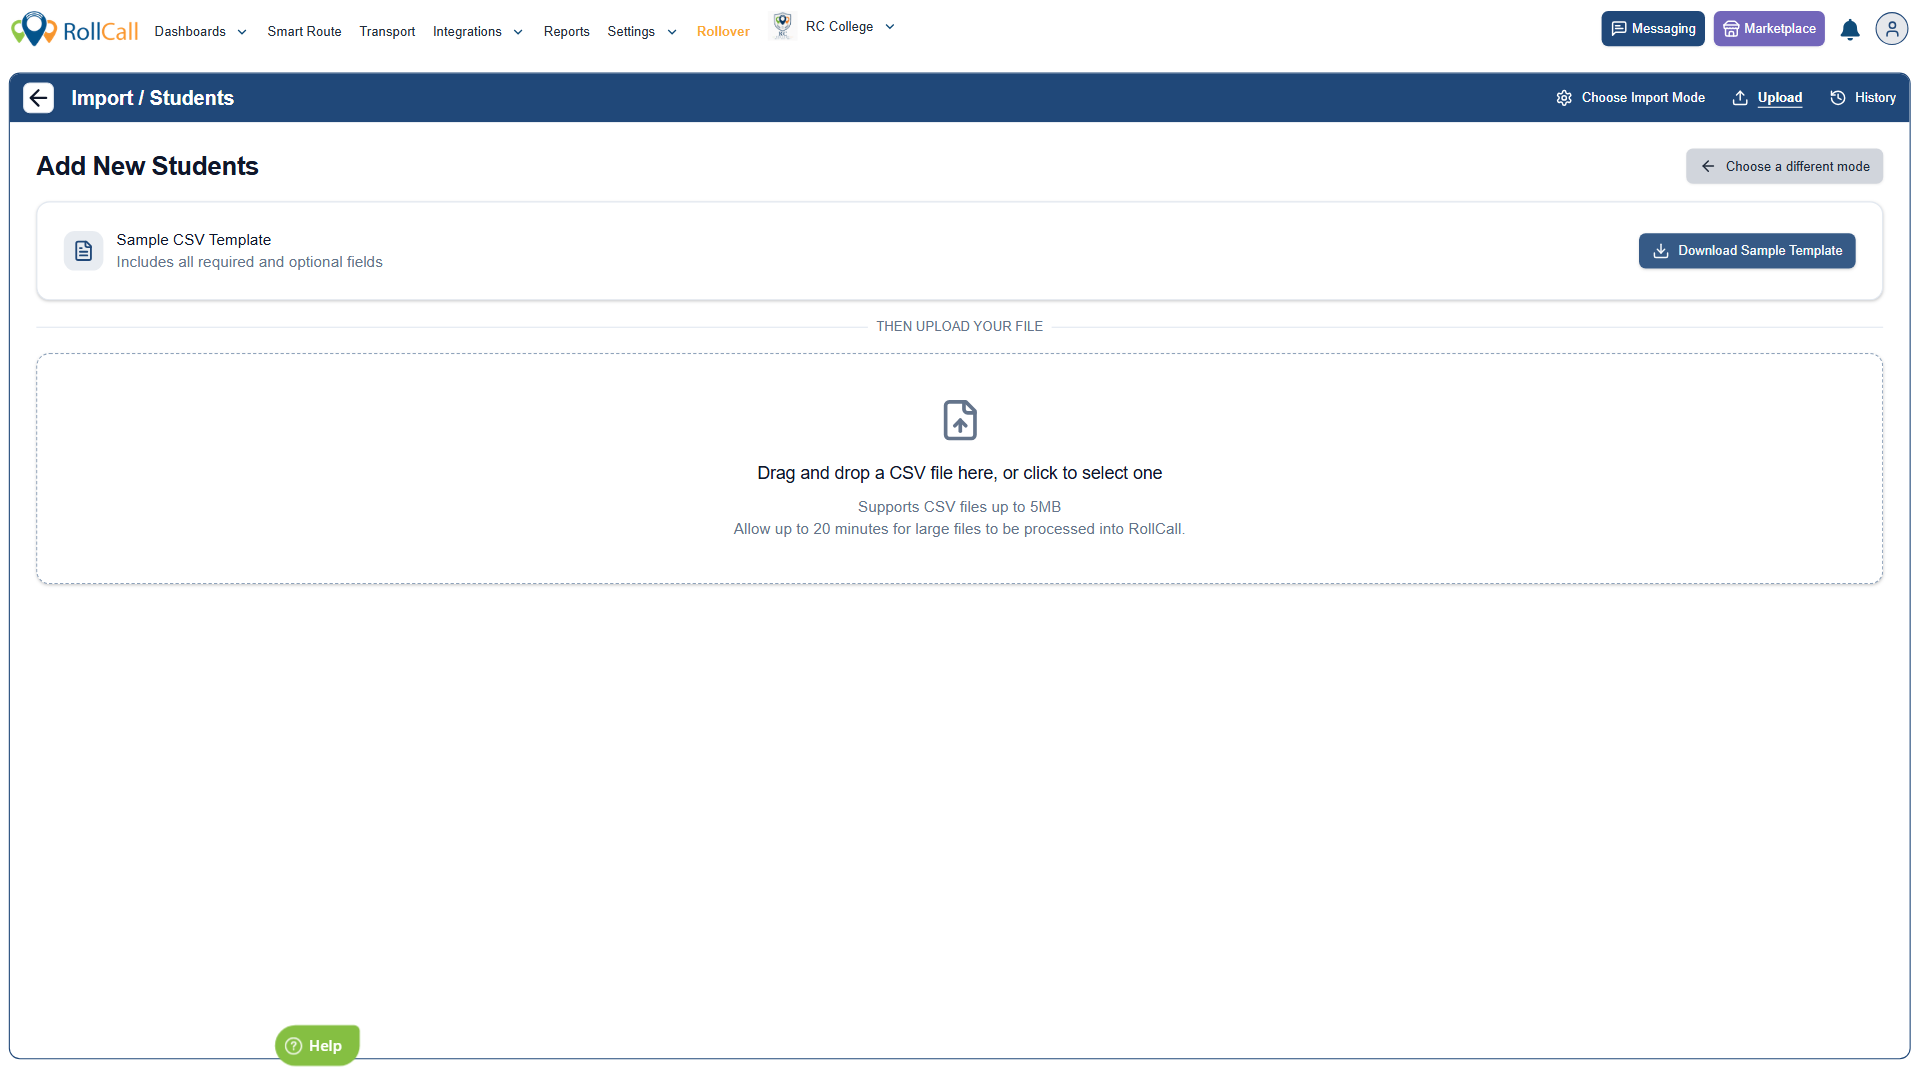
Select Download Sample Template. It downloads a CSV file you can open in Excel. It includes every column, both required and optional.
Understand the template: what to keep and what to delete
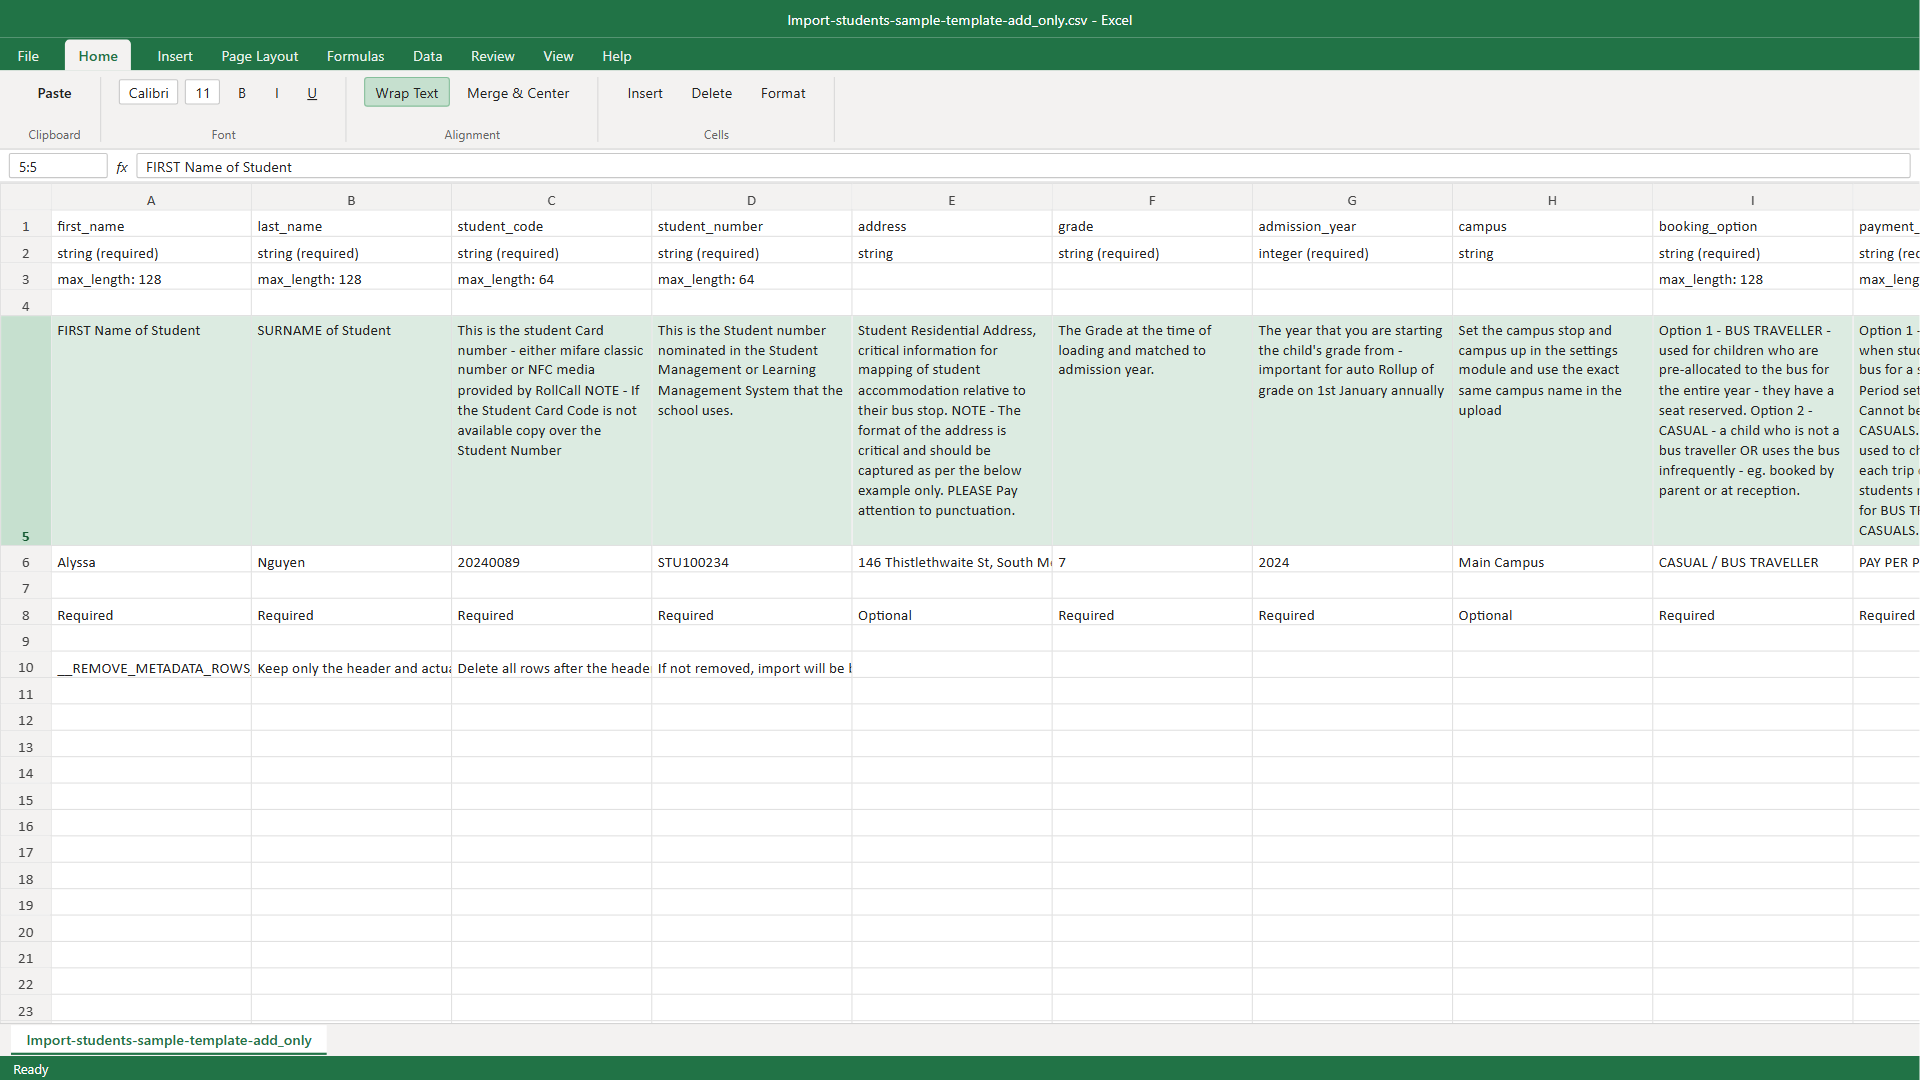
When you open the template, you'll see ten rows:
| Row | What it is | Keep it? |
|---|---|---|
| 1 | The column names (first_name, last_name, student_code…) | Yes. Keep this row exactly as it is. |
| 2 | The type of each field, and whether it's required | No, delete it |
| 3 | The maximum length of each field | No, delete it |
| 5 | A description of what goes in each column | No, delete it |
| 6 | An example student (Alyssa Nguyen) | No, delete it |
| 8 | Whether each column is Required or Optional | No, delete it |
| 10 | A reminder to remove these rows before uploading | No, delete it |
Rows 4, 7 and 9 are blank.
Rows 2 to 10 are only a guide. Read them, then delete them before you add your students. RollCall won't accept a file that still has any of them in it. You'll see "Remove template metadata rows… keep only the header and actual data rows, then upload again."
Tip: the descriptions in row 5 are long. To read them, select row 5 and choose Wrap Text on the Home tab.
What goes in each column
Type options exactly as shown here, for example BUS TRAVELLER and PAY PER PERIOD. Leave optional cells blank if they don't apply.
| Column | Required? | What to enter |
|---|---|---|
| first_name | Required | The student's first name (up to 128 characters). |
| last_name | Required | The student's surname (up to 128 characters). |
| student_code | Required | The number on the student's RollCall card (a MIFARE Classic number or NFC media supplied by RollCall). If the student doesn't have a card yet, copy in their student number. Up to 64 characters. |
| student_number | Required | The student number from your school's student or learning management system. Up to 64 characters. |
| address | Optional | The student's home address. RollCall uses it to map where students live in relation to their bus stop, so the format matters. Write it like the example, punctuation included: 146 Thistlethwaite St, South Melbourne VIC 3205, Australia |
| grade | Required | The student's grade at the time you load them. It goes with admission_year. |
| admission_year | Required | The year the student starts that grade, for example 2027. RollCall uses it to move students up a grade automatically on 1 January each year. |
| campus | Optional | Must exactly match a campus name set up in Settings → Campus, for example Bundoora Campus. |
| booking_option | Required | BUS TRAVELLER for students allocated to the bus for the whole year, with a reserved seat. CASUAL for students who aren't bus travellers or use the bus now and then (for example, booked by a parent or at reception). |
| payment_charging_option | Required | PAY PER PERIOD for students who pay for the bus for a set period (set in the next column). PAYG to charge per trip, as the student rides. Casual students can't be Pay Per Period. PAYG works for both bus travellers and casuals. |
| payment_frequency | Optional | Pay Per Period students only: Year, Term or Semester. It presets the period on the student's file, so you can send Pay Per Period charges easily. |
| discount_percentage | Optional | A discount applied to the Pay Per Period amount when charges are processed, or to each PAYG charge. For example, 10. |
| fixed_fare | Optional | Pay As You Go only: a set rate charged for this student, for example 5.50. |
| contact_first_name, contact_last_name | Optional | The primary carer's name, as it appears in your student or learning management system. |
| Optional | The primary carer's email address (up to 256 characters). | |
| phone | Optional | The primary carer's mobile number. For Australian numbers, enter the mobile number only, without the country code. For other countries, start with the country code (for example, +974 for Qatar). |
| contact_first_name_2, contact_last_name_2, email_2, phone_2 | Optional | A second parent or carer, in the same format as above. |
| driver_attention_flag | Optional | TRUE makes the student's tag show in orange in the Driver app. Otherwise leave it blank or enter FALSE. |
| handover_code | Optional | For younger students, if your school uses handovers: PAR (parent collection required), SIB (sibling escort) or OWN (walks home independently). See Handover codes below. |
Delete the guide rows and add your students
- Select rows 2 to 10 and delete them, so only the column names in row 1 are left.
- Add one row per student, starting on row 2.
- Save the file, keeping the file type as CSV. Don't change it to an Excel workbook.
Upload your file
- Back in RollCall, drag your file onto the upload box, or click the box to choose it.
- Select Upload File to confirm.
CSV files can be up to 5 MB. Large files can take up to 20 minutes to be processed into RollCall.
Check your rows: Ready to Import or Needs Review
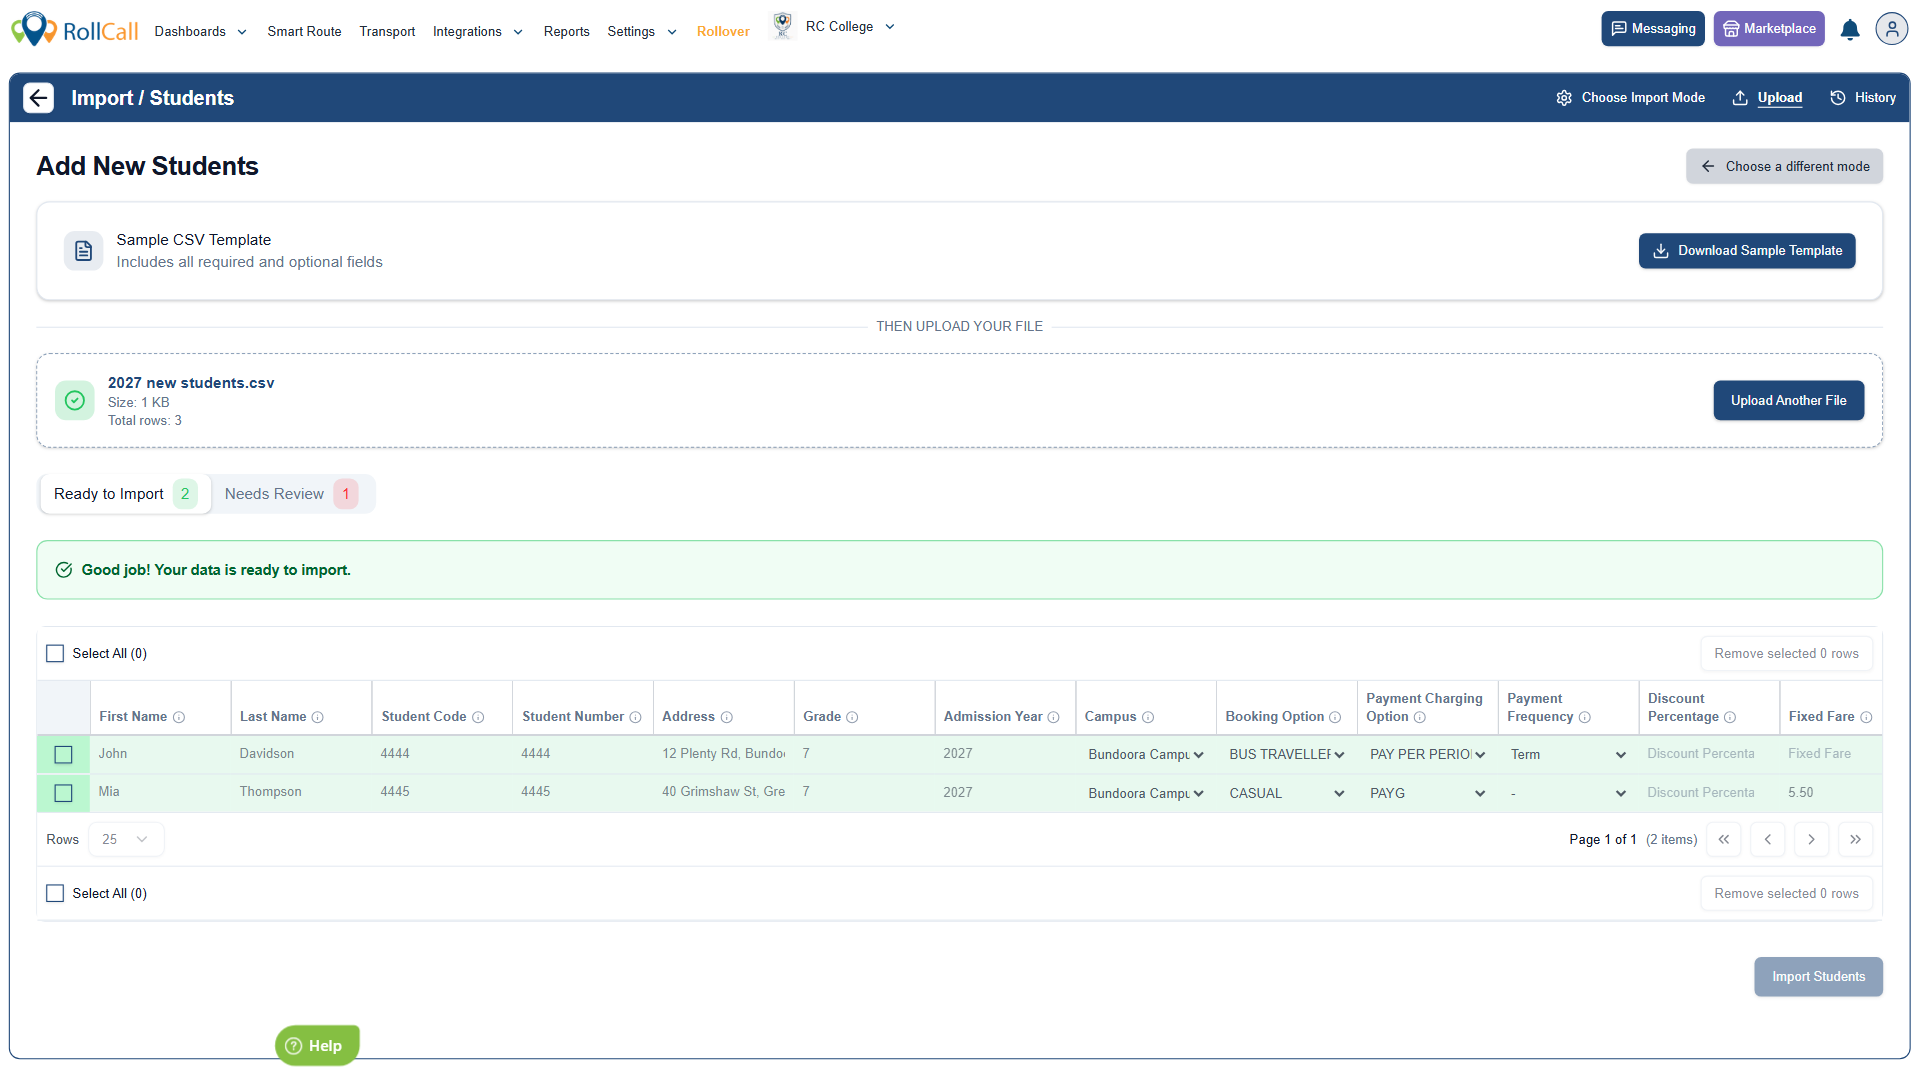
RollCall checks every row and sorts them into two tabs:
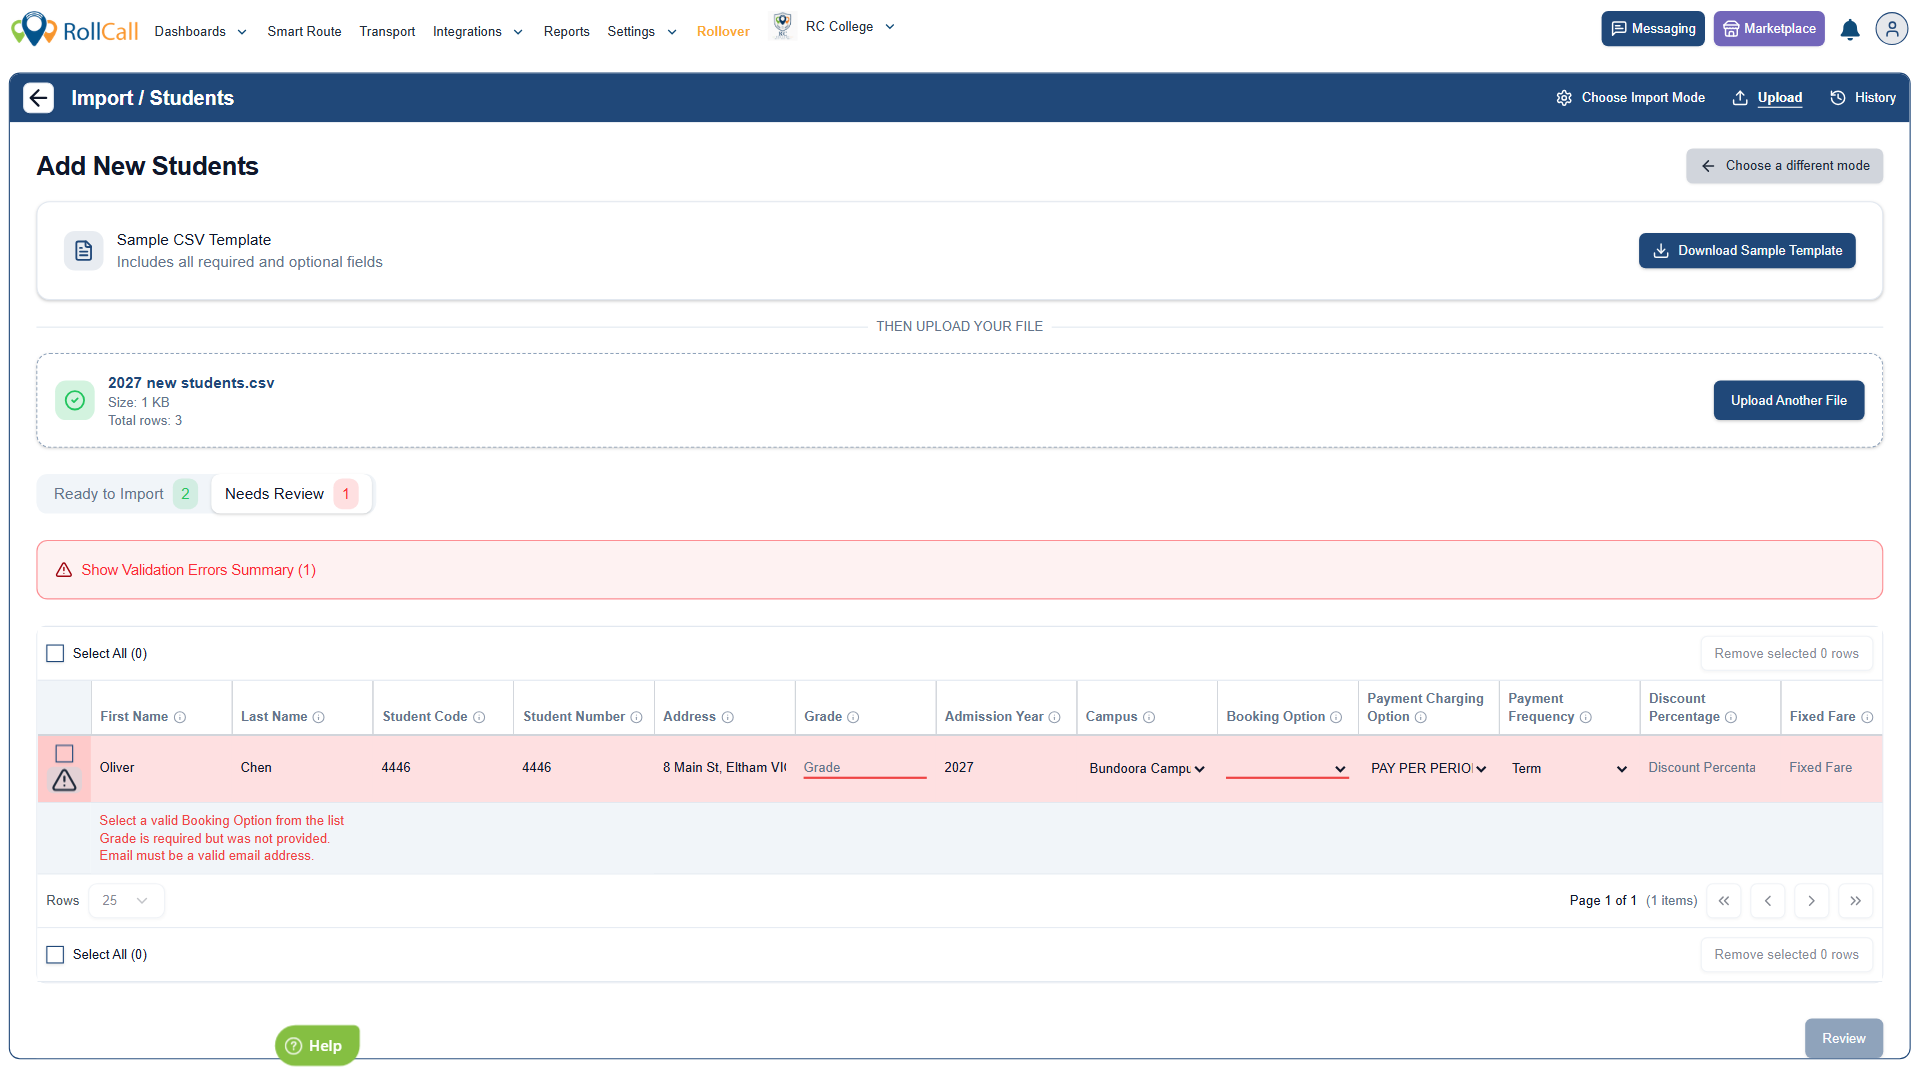
- Ready to Import: rows that are good to go.
- Needs Review: rows with something to fix, shown in red.
Fix anything that needs review
- Open Needs Review.
- Select the warning sign on a red row to see exactly what's wrong, or select Show Validation Errors Summary for a list.
- Fix each problem right there in the table. You don't need to go back to Excel. Fields with a problem are underlined in red.
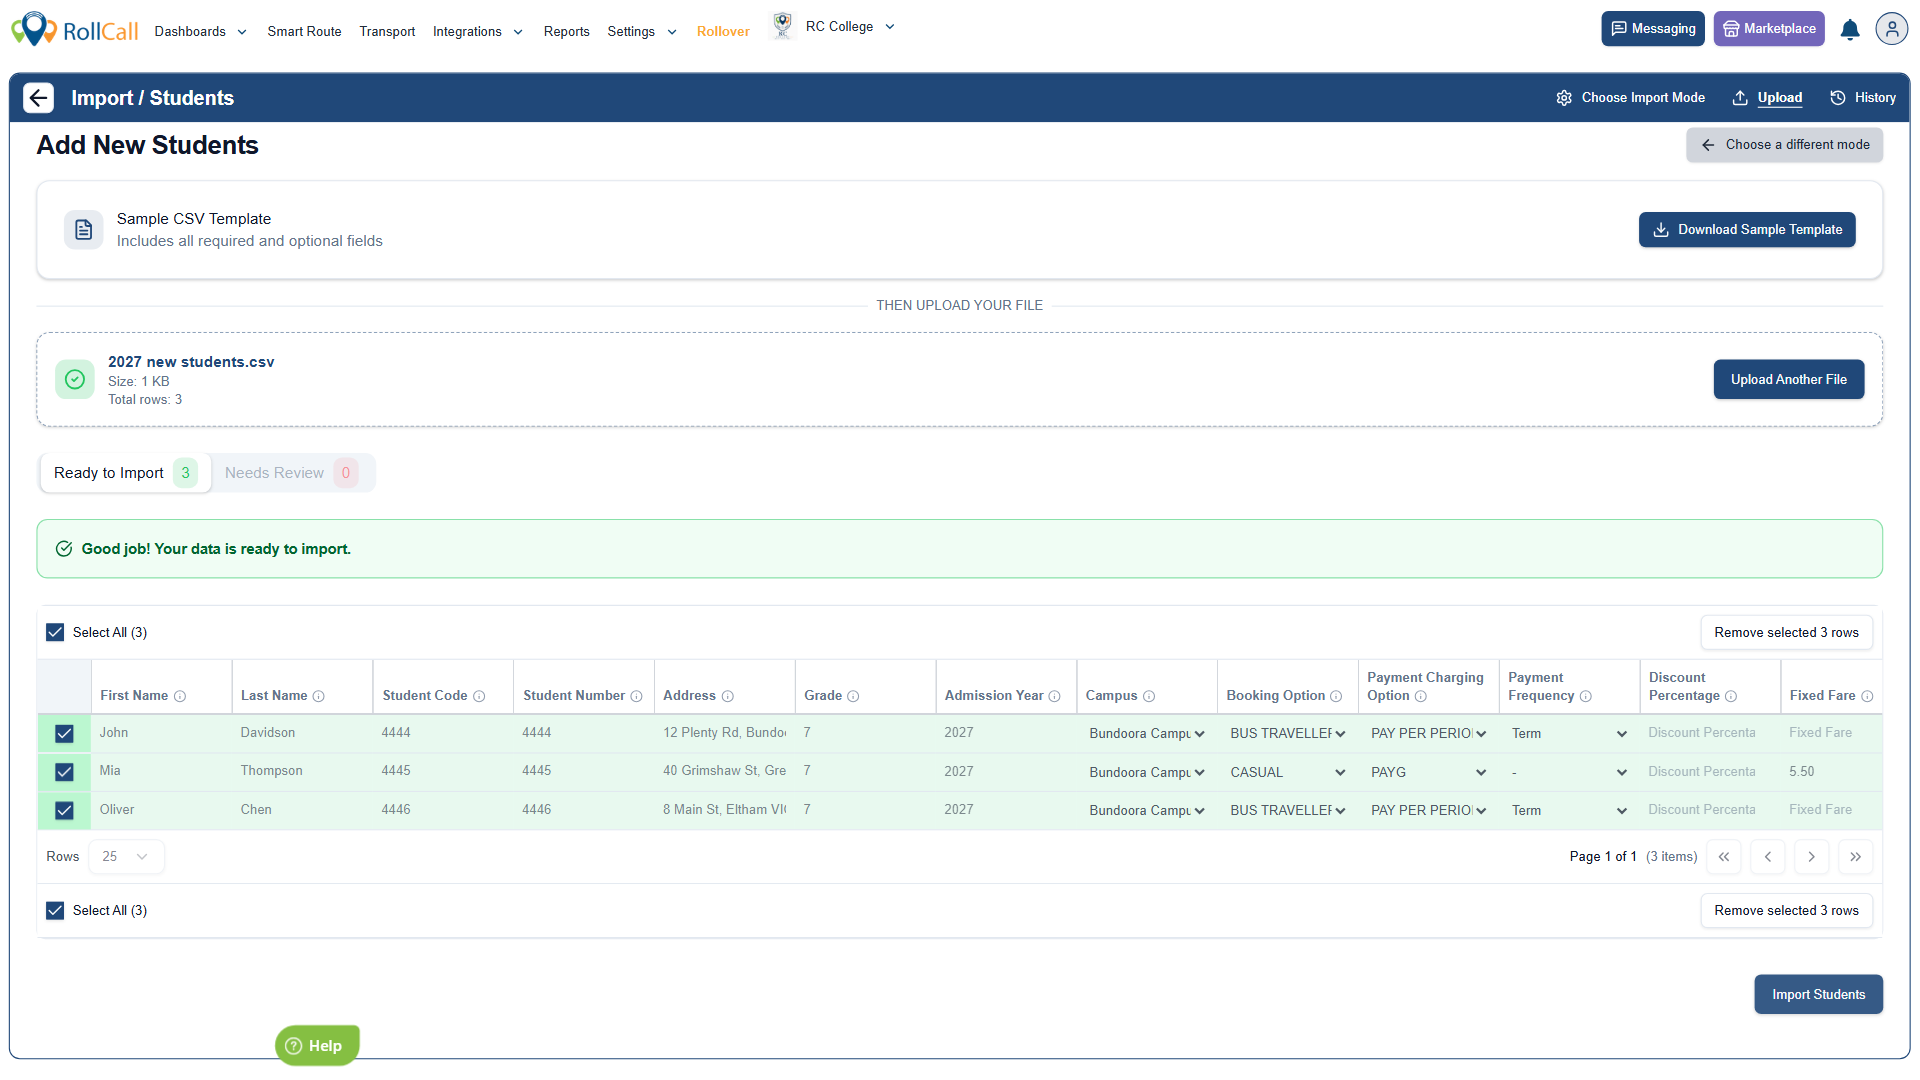
- When the row is fixed, it turns green and RollCall shows "Good job! You fixed the errors."
- Tick the row and select Review. RollCall checks it again and moves it to Ready to Import. Select View Ready to Import to carry on.
If you'd rather leave a student out, tick the row and select Remove selected rows.
Import your students
- On Ready to Import, tick the students you want to import, or tick Select All.
- Select Import Students.
Import Students stays greyed out until at least one row is ticked.
To see your past imports, select History at the top right of the import screen.
Handover codes
Handover codes help drivers safely drop off younger students. They're only available for students whose grade is below your school's Wrong Stop Alert grade threshold, and handover must be turned on for the event group the student travels in (Settings → Event Groups → Handover Enabled).
| Code | Meaning | In the Driver app |
|---|---|---|
PAR | Parent collection required: the student must be handed directly to a parent or guardian | Purple handover badge, a reminder when scanned on, and a warning when scanned off |
SIB | Sibling escort: an older sibling on the bus escorts the student | Same as PAR |
OWN | Walks home independently | No badge or handover warnings |
Students below the threshold are set to PAR by default. Wrong Stop Alerts still apply to all three codes.
Checklist before you upload
- The guide rows are gone. Rows 2 to 10 are deleted, so only row 1 and your students are left. RollCall won't accept the file otherwise.
- Row 1 is unchanged. Keep the column names exactly as they come in the template.
- Options are typed exactly. For example,
BUS TRAVELLER, notBUS. A row with an option RollCall doesn't recognise goes to Needs Review. - Required fields are filled in. A missing grade is a common one.
- Email addresses are complete. For example,
grace.chen@example.com, notgrace.chen@example. - Campus names match Settings exactly.
- The file is saved as a CSV. The upload accepts CSV files only.
Need a hand? Our support team's only an email away.
Was this article helpful?
That’s Great!
Thank you for your feedback
Sorry! We couldn't be helpful
Thank you for your feedback
Feedback sent
We appreciate your effort and will try to fix the article